Bouncing into Spring!
Firstly we got ourselves a letter box - hurrah! Rather mundane you might say, but up till now we have been borrowing our neighbour's letter box (the address we previously stayed at), which was usually stuffed full of our numerous online purchases. Now we can stuff our own :)

So what you do you when you get a letter box? Obviously you try and post your brother somewhere else! Fortunately for him, she forgot to attach the correct number of stamps.

 |
| He was actually quite cosy in there! |
We know it is spring because these strange things started appearing on our hill. We seeded it last season after some earthworks were done, nice to have our own little meadow.


Don't ask me for their names :)
Of course now that the weather is starting to warm up again, it is an opportune time for us to explore the beginnings of our food forest. Needless to say we are starting modest and will be learning as we go.


Amongst the trees planted are pears, apples, hazel nut, walnut, peach - the citruses will be next, as well as the persimmons and olives. Due to the cost of building our house we've been a little shy of spending huge on trees, but we think we have a good start with what we've got. Let's put it a different way, it's more trees than we've ever had before :)
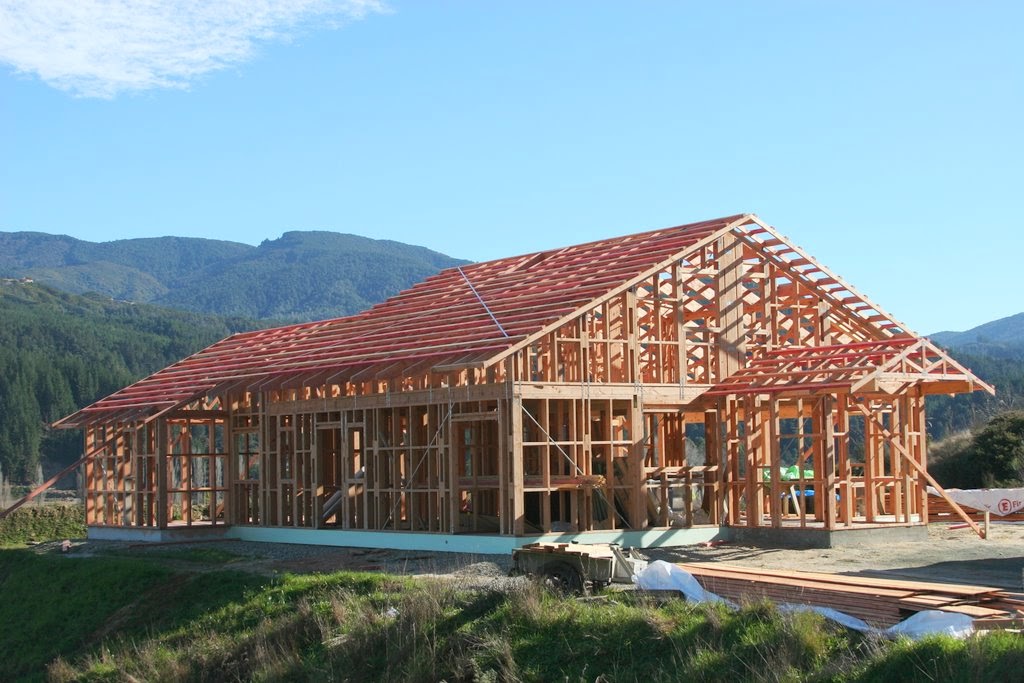
House build
This blog post would be incomplete without a continuing account of our house build. The reason for the long silence from the previous post was due to time taken to get a major amendment through the council - this is for various detailing changes. In particular we have decided to build the house out to the west which was previously a future extension, as well as enclosing the front east entrance rather than leaving it as an open porch. We changed our minds because it was going to be much simpler and cheaper to get them done now, in particular where flashings and waterproofing had to be considered.
Here it is:
 |
| North Face |
 |
| South Face |
 |
| West Face |

This is view to the west with our existing PV array, and yes that dare-devil-wannabe on the ridge is me. Katie wasn't quick enough to capture the cart wheels ... oh well ;)
Of course we can't have these kinds of shenanigans, we need some decent scaffolding. We decided to go with the InTaks system, researched and developed here in New Zealand. The system attaches to the framing of the house and doubles both as a platform to stand on as well as side-edge protection for when the roofers go up there to do their job - they do much safer cart wheels than me. Phil from Roof Edge Solutions was an absolutely brilliant guy, highly recommend him. He was very professional and excellent to deal with.


 |
| Each of these brackets have been engineered to hold 250kgs, plenty enough for the planks and a few guys to stand on safely. There is a pole every ~2.5 metres, makes for a strong and rigid structure once the Aluminium planks are in. The entire system is made from Aluminium too, making it light weight and easier to transport. |
 |
| Each pole goes down to the ground which allows the system to extend beyond the perimeter of the house up to 1.2m maximum. |
 |
| The top features a pole with brackets to connect the side-edge protection railings. |
Once that was up, the roofers came unto the site to do their job. We decided that we would settle for a ZAM roof. I discussed various roof types in a previous blog post, where I explained the reasons for choosing a particular roof material. For a time I was seriously considering 445M2 stainless steel (see previous post) but this was not that well supported locally - I would have had to buy the material coil as a raw product from Auckland (ex Japan), and ship it to a toll roller in Wellington who has previously worked with it. It would then get shipped to me and I have to get an independent roofer to put it up, preferably somebody who has worked with this material before. Additionally all fastenings would have had to be stainless steel 316. It was probably going to get on for NZ$30K, though this was about half the price of Zinc Titanium, which was my first consideration.
ZAM came in at the 11th hour when the local roofing supplier (Contour) managed to get it specially ordered. As they were also doing the metal fascia and guttering, this one-stop-shop made it an easy decision to go with ZAM. All this with a guarantee over the entire process at 1/2 the cost of 445M2 - sealed the deal. It may not last as long as 445M2, but I'm picking it will surpass 40-50 years at least. The main concern (as with most metal roofs) is acid rain, and ph levels of 3.0 or lower is the threshold where this effect will be most pronounced. As CO2 levels rise in the atmosphere, the acidity of the rain is likely to increase - fortunately the CO2 dissolved in water tends to make a somewhat weak acid with ph levels between 3-4. The sulphuric acid caused by industrialised pollution is less of a concern to us as we are in the wop-wops! :)
ZAM is used as a base substrate material on ColorCote ZM8/ZMX roofs for seaside installations. This material has a mixture of Zinc, Aluminium and Magnesium (hence ZAM) - the Magnesium acts to arrest the metal oxidation process by interacting with the exposed metal and forming a new skin. The migration of Zinc ions to cut edges does happen even in standard Zinc Aluminium coatings, however the presence of Magnesium makes this new coating much stronger and more resistant to further corrosion. If you are interested, you can read more here:
http://www.zam.biz/en/features/index.html
http://www.nextgenzincalume.com.au/activate.html


We also decided to use a self supporting non-flamable paper underlay, rather than bituminous black paper (or tar paper). It does the same job, but doesn't catch on fire easily. We are in a rural area where the risk of forest fires can at times be high. With the potential for global warming to influence hotter and longer summers, mitigating fire risk seemed wise. The motivation to use this material was primarily to reduce the chances of a roof fire which is incredibly difficult to fight.
We will also be installing a home fire sprinkler system to help reduce and mitigate the effects of fire damage. This method uses much less water to put a fire out by nipping it out when it is small, rather than when it is an angry beast. With water being a premium requirement in those long summers, needing a lot less of it to fight a fire seems a crucial point to consider.
Smoke detectors will save your life, but it won't save your house. You can insure the house (although we are wary of the increasing uncertainties with insurance companies these days), however rebuilding a house is easier than rebuilding a home - many memories are lost when a home goes up in flames.
Sprinklers are a somewhat costly exercise to install, but over the long term we think it is money well spent.


The reason why I choose to have the bare ZAM instead of colour is because I didn't want any of the paint molecules from a coloured roof to end up in our drinking water - something that could become more of a problem when considering a roof lifetime in excess of 50 years. There is much anecdotal evidence claiming that it is ok to drink from a painted roof - in fact these roofs are rated for potable water collection. I can trust these results when the roof is new, but over time (20 years+) I'm not sure that the paint surface can remain stable when it is baked in the sun and exposed to the weather elements. It will eventually fade - I'm less concerned about flaking because paint technology has moved on, and even so these flakes typically get deposited at the bottom of the tank or filtered out. Dissolved paint is more difficult to remove.

The south side of the house features a large skylight. We had this on the south because we wanted good amount of light without the effects of having the harsh direct light, as well as the associated heat in summer.
The unfortunate thing about ZAM is that the reflective co-efficient is higher than a standard recessive colour ColorCote/Colour Steel product with a matt finish. I'm hoping that the roof will start to fade to a matt colour in time, as our ZincAlume roof has done.

Once the roof was up, the solar water collector was installed. I did this together with Alan who also did the underfloor pipes in our slab.

The frame of the solar heater was made to be 20 degrees on our 25 degree roof, giving it a 45 degree angle. This is optimum for both winter and summer sun. Optimizing purely for winter sun would have meant something like 65 degrees, but I thought that would look a little awkward on the roof.

The builders came back and started to then work on the soffit boards. Here we used fairly stock standard soffit fibre boards which we pre-painted to a creamy white colour. These are installed with jointers between the pieces to hide the edges. Prior to the installation the top bit of building paper is applied and the soffit is boxed out for attaching the boards.
Once the soffits were completed, the rest of the house got wrapped.


 |
| The windows are cut out of the building paper and stapled around the borders. This is one of the best views in the house :) |
 |
| Builders get to have so much fun, here he is playing peek-a-boo! |
Once the building paper is installed, the edges are taped down with a damp proofing tape to ensure water doesn't get trapped and soak into the wood. This is a belt and braces approach seeing that we have also employed a cavity wall system which allows the wood to dry out.

The front entrance is adorned with an ornamental truss to finish the gable end. There is a grooved ply backing and macracarpa beams attached to it to make it nice looking. One immediate snag however is that less than 24 hours after it was completed a bird made a nest it in :) ... will have to find a way to block up the holes down the sides.


I mentioned that we were on a cavity system previously. Due to the use of bevelled back weather boards, we didn't have to use a cavity system because this is an approved cladding that allows air to pass through it. However after much advise from many different experts, we concluded that it was safer to incorporate a cavity system. This means that if water did find a way to penetrate the cladding, it would slip down the cavity and drain out the bottom, or eventually just dry out. The presence of water encourages rot and wood decay over time.
A cavity system involves adding battens to the building before the weather boards are placed. The bottom of the wall is fixed with a vermin strip, which allows air to move up into the cavity but prevents vermin from entering the house.


Once that is done, the weather boards get fixed to the cavity battens. Just like our shed, we have decided to use Larch weather boards which have been pre-oiled with a product from Natural House, a local family owned company here in Motueka.


By and large the main horizontal bits of weather boards were relatively straight forward and quick to go up. However it took on average 2 days per gable end (raking sides) due to the detailing involved in the raking (triangle) windows. Much care and attention goes into ensuring that the line matches up nicely. Check out the picture below for the detailing of the top edge - this is precision work, I thought the builders did a great job!

Note also that there is a silver aluminium bar at the bottom of the window. This is called a WANZ bar and is used to support the bulk of the window frame which sits out over the frame due to the weather boards and cavity system. All windows and doors have this bar attached, and it also features a perforated holes at the bottom to allow water to drain out in the event the flashing around the window fails.


This is pretty much our house to date with good progress.
However dark clouds have come our way regarding our 2nd hand window joinery. I'll discuss that in my next blog post.


Comments
Post a Comment